Tutorial: Drone CI Setup Part One

For a beginner that had only used GitHub Actions, I found most tutorials slightly lacking in details to get a good drone pipeline up and running from scratch.
Here's what we'll accomplish:
- Part One: (This Article)
- Create a docker repository
- Create a drone server
- Create a drone runner
- Part Two: (Not Yet Released)
- Create a real world example pipeline
Assumptions
- We have created 2 subdomains:
- drone.mydomain.com
- docker.mydomain.com
- We have apache2-utils installed
Ubuntu / Debian based: sudo apt install apache2-utils - We have docker and docker-compose already installed
- We have a reverse proxy already operating
- I recommend nginx-proxy-manager for those new to reverse proxies.
- NOTE: Drone does have the option to generate it's own SSL Cert via Let's Encrypt, however the registry image does not so we will opt to use a reverse proxy to manage certs for both.
- We will not go over setting up Nginx Proxy Manager or other reverse proxies in this tutorial. Here is a good tutorial to get you started.
Create Compose Files
Everyone has their own base directory they use for docker-compose. Personally, I put all my compose files under each stack's own directory under /usr/local/docker. Feel free to use whatever you feel is best for your setup.
mkdir /usr/local/docker/cicd/
Copy the following compose file to this newly created directory:
version: '3.6'

services:
  drone:
    container_name: drone
    image: drone/drone:${DRONE_VERSION:-2}
    restart: unless-stopped
    environment:
      - DRONE_DATABASE_DRIVER=sqlite3
      - DRONE_DATABASE_DATASOURCE=/data/database.sqlite
      - DRONE_RPC_SECRET=${DRONE_RPC_SECRET}
      - DRONE_SERVER_PROTO=${DRONE_SERVER_PROTO:-https}
      - DRONE_SERVER_HOST=${DRONE_SERVER_HOST:-drone}
      - DRONE_GITHUB_CLIENT_ID=${DRONE_GITHUB_CLIENT}
      - DRONE_GITHUB_CLIENT_SECRET=${DRONE_GITHUB_SECRET}
    ports:
      - "4000:80"
      - "9000:9000"
    networks:
      - ${DOCKER_NETWORK_NAME:-cicd_net}
    volumes:
      - /var/run/docker.sock:/var/run/docker.sock
      - ./drone:/data

  drone-runner:
    container_name: drone-runner
    image: drone/drone-runner-docker:${DRONE_RUNNER_VERSION:-1}
    restart: unless-stopped
    depends_on:
      - drone
    environment:
      # https://docs.drone.io/runner/docker/installation/linux/
      # https://docs.drone.io/server/metrics/
      - DRONE_RPC_PROTO=http
      - DRONE_RPC_HOST=drone
      - DRONE_RPC_SECRET=${DRONE_RPC_SECRET}
      - DRONE_RUNNER_NAME="${DRONE_RUNNER_NAME:-drone-runner}
      - DRONE_RUNNER_CAPACITY=${DRONE_RUNNER_CAPACITY:-2}
      - DRONE_RUNNER_NETWORKS=${DOCKER_NETWORK_NAME:-cicd_net}
      - DRONE_DEBUG=false
      - DRONE_TRACE=false
    ports:
      - "3000:3000"
    networks:
      - ${DOCKER_NETWORK_NAME:-cicd_net}
    volumes:
      - /var/run/docker.sock:/var/run/docker.sock

  registry:
      image: registry:2
      ports:
        - 5000:5000
      environment:
        REGISTRY_AUTH: htpasswd
        REGISTRY_AUTH_HTPASSWD_REALM: Registry Realm
        REGISTRY_AUTH_HTPASSWD_PATH: /auth/.htpasswd
        REGISTRY_STORAGE_FILESYSTEM_ROOTDIRECTORY: /data
      restart: unless-stopped
      volumes:
        - ./registry/auth:/auth
        - ./registry/data:/data

networks:
  ${DOCKER_NETWORK_NAME:-cicd_net}:
    name: ${DOCKER_NETWORK_NAME:-cicd_net}
All of those variables enclosed in ${} will be fed with values from a .env file we will create with the following contents:
MYDOMAIN=mydomain.com

DOCKER_NETWORK_NAME=cicd_net

DRONE_VERSION=2
DRONE_HOSTNAME=drone
DRONE_SERVER_HOST=$DRONE_HOSTNAME.${MYDOMAIN}
DRONE_RPC_SECRET="$(echo ${DRONE_SERVER_HOST} | openssl dgst -md5 -hex)"
DRONE_SERVER_PROTO=https
DRONE_GITHUB_CLIENT_ID=<YOUR GITHUB OAUTH CLIENT ID>
DRONE_GITHUB_CLIENT_SECRET=<YOUR GITHUB OAUTH CLIENT SECRET>

DRONE_RUNNER_VERSION=1
DRONE_RUNNER_CAPACITY=2
DRONE_RUNNER_NAME=${DRONE_HOSTNAME}-runner
- MYDOMAIN: Your domain name
- DOCKER_NETWORK_NAME: can be just about anything you want (no spaces)
- DRONE_VERSION: Here you can specify a specific version (2.12.1), the newest stable release in major version (1 or 2), or latest (not recommended). Available Tags
- DRONE_HOSTNAME: Whatever your subdomain is
- DRONE_SERVER_HOST: Automatically generated using your DRONE_HOSTNAME and MYDOMAIN
- DRONE_RPC_SECRET: Automatically generated using DRONE_SERVER_HOST
- DRONE_SERVER_PROTO: Set to https if you will use SSL (STRONGLY RECOMMENDED)
- DRONE_GITHUB_CLIENT_ID: Generated from GitHub (See Below)
- DRONE_GITHUB_CLIENT_SECRET: Generated from GitHub (See Below)
- DRONE_RUNNER_VERSION: Here you can specify a specific version. Available Tags
- DRONE_RUNNER_CAPACITY: Max Number of pipelines to execute. Too many and it will bog down your system.
- DRONE_RUNNER_NAME: Automatically Generated using your DRONE_HOSTNAME
GitHub OAuth Client ID and Client Secret Generation
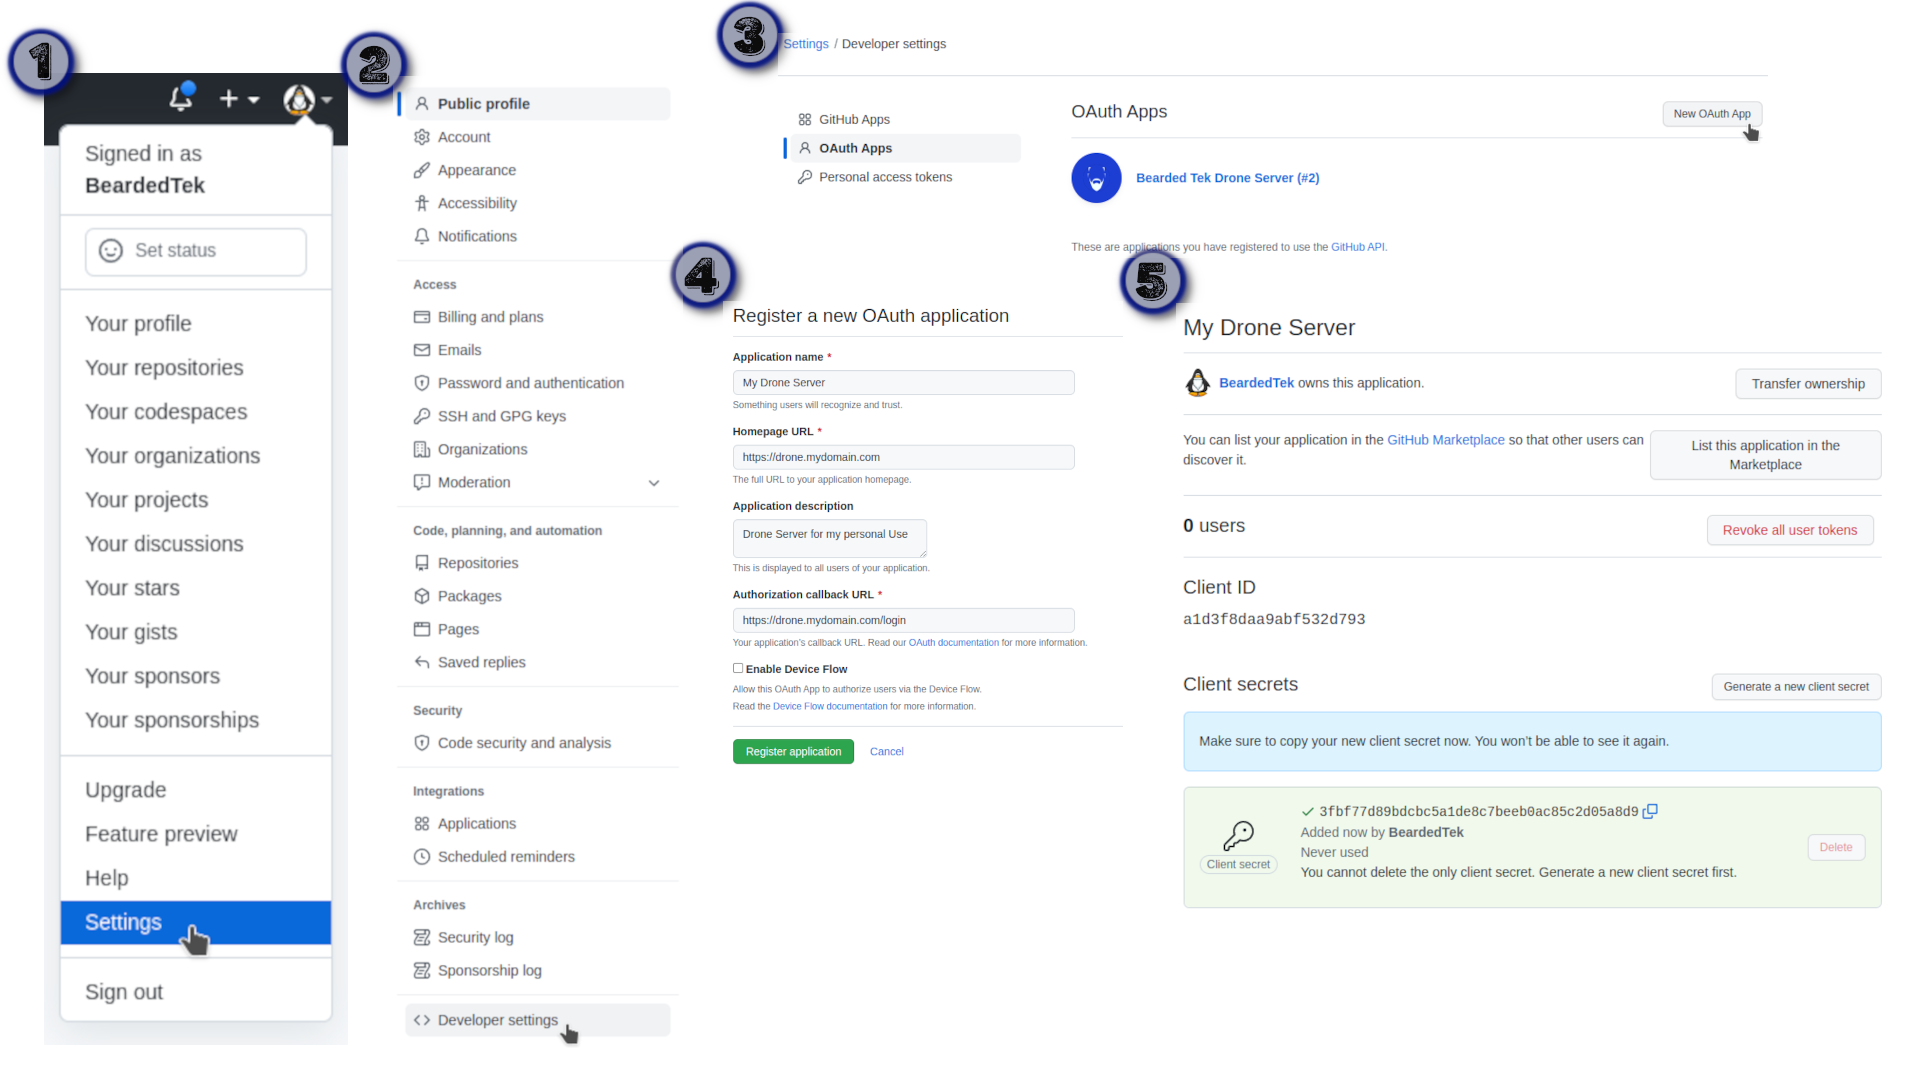
To obtain your Github Client ID and Client Secret, follow my example.
NOTE:all Client ID's and Client Secrets have been deleted from this process)

Login to your GitHub account and follow the GitHub OAuth Workflow:
- Click your account avatar and select Settings
- Scroll down to Developer settings
- Select OAuth Apps and click New OAuth App
- Fill in required fields marked with an asterik and click Register Application
- Click Generate a new client secret
Use the information on this page to fill in DRONE_GITHUB_CLIENT_ID and DRONE_GITHUB_CLIENT_SECRET in your .env file.
Docker Registry
We will use HTTP Authentication for our registry. To accomplish this, run the following commands:
mkdir registry
mkdir registry/auth
htpasswd -Bc registry/auth/.htpasswd my-username
Bring up the stack
Now that we have everything all defined, let's bring up the stack:
sudo docker-compose up -d
Login to Drone!
Simply visit your new drone install and it will bring you through the GitHub OAuth Process
Part Two Coming Soon
Part Two will go over creating a drone.yml file in your GitHub Repository
