My NixOS Journey Part 1
I've been wanting to try NixOS for quite some time. The idea of an immutable filesystem to use as a docker host seems very interesting, however, it's fairly intimidating to get started.

Part One | Part Two | Part Three
Welcome to my journey. I'm documenting how I make my way down the rabbit hole, failures, successes, lessons learned all in hopes that I don't do it again, and maybe you'll be able to take away something from this too.
Where to discuss this article or contact me
Matrix:
#my-nixos-journey:beardedtek.com
#nixnerds:jupiterbroadcasting.com
@beardedtek:beardedtek.com
Telegram:
@beardedtek
Twitter:
@beardedtek
Email:
contact@beardedtek.com
I've been wanting to try NixOS for quite some time. The idea of an immutable system to use as a server platform seems very interesting, however, it's fairly intimidating to get started.
I plan on documenting everything along the way. All my mistakes, pitfalls, and bad habits I've brought along with me. It may not be flattering, but it comes from a place of truth.
I've been using Linux in one way or another since the late 90s starting with Slackware 3 point something and OG Red Hat. I've had laptops where I damaged the screen because my XFree86 config was way off. I've run Debian on a Pentium Pro 100 with dialup and a static IP running on a 28.8kbps dialup modem. OpenSUSE Tumbleweed, Ubuntu Server 23.04 and Debian have become my go-to distributions.
If you see me going down a wrong path or just want to discuss this article, please join me on Matrix at #my-nixos-journey:beardedtek.com.
Thanks to Jupiter Broadcasting and their Nix community which can be found on matrix at #nixnerds:jupiterbroadcasting.com, I'm at least starting to test the waters with my pinky toe.
The path I've decided to take will be the following:
- Install a simple system in a VM with the graphical installer
- Install a simple system in a VM with the manual text minimal installer
- Configure Nix to be a simple docker host (Not exactly the Nix way, but that's okay)
- See where this all leads me!
Article continues below
While you're here, check out my Etsy Store where I produce 3D Printed Nerdery
15% OFF 2 or more items throughout July 2023!
Preparation
Prerequisites to install NixOS
There's a couple things we need to do before we get started.
Download the installer, the current version as of writing this is 23.05:
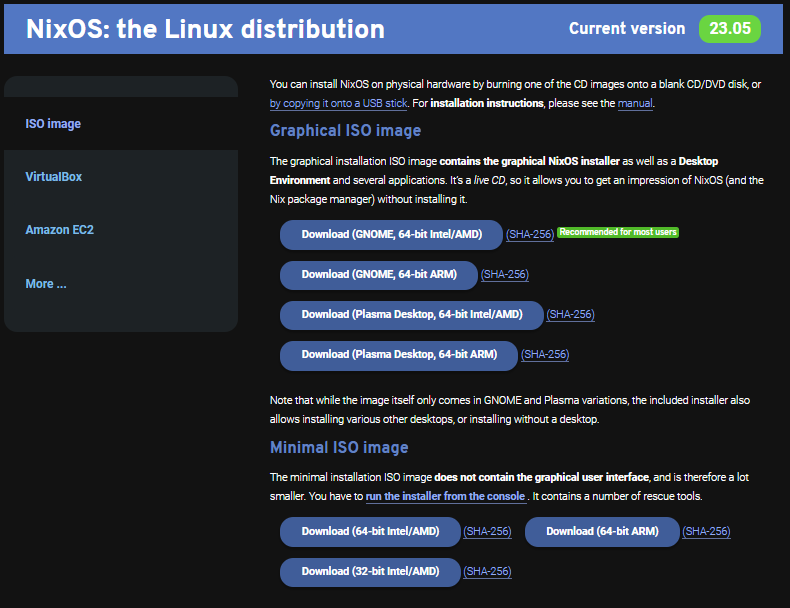
I acquired both the Plasma Desktop, 64-bit Intel/AMD and the Minimal 64-bit Intel/AMD version. Make sure you download the version that matches your hardware.

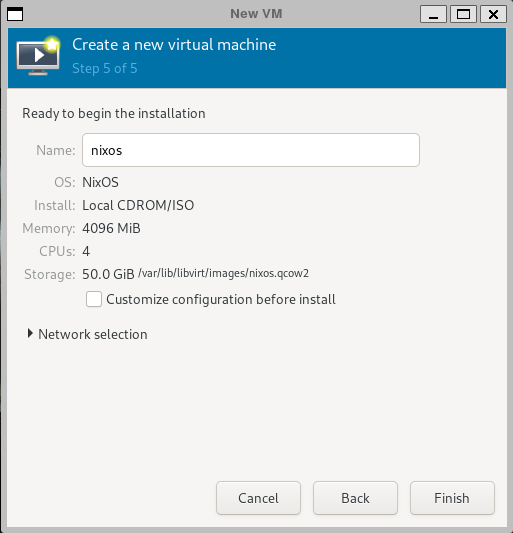
Create a Virtual Machine and attach our installer iso as a bootable CDROM/ISO
NixOS Graphical Installer
"The Easy Way"
The Graphical Installer is actually quite easy to use. It took about 4 minutes to install the system. That's right 4 minutes. Impressive.
NixOS Manual Install
Setting it up as a basic docker host with cockpit
Conducting a manual install from the stock install medium is a bit more intense for someone not comfortable on the command line. However, most Linux users used to the command line should be fairly familiar with most of the required commands.
I followed the Manual Installation Instructions available on nix.org. I'll outline them here, but for the most up to date information follow the link above.
Here's the highlights of what I changed in my configation.nix
For EFI Boot:
# Use the systemd-boot EFI boot loader.
  boot.loader.systemd-boot.enable = true;
  boot.loader.efi.canTouchEfiVariables = true;
Set Timezone:
time.timeZone = "America/Anchorage";
User Setup
  users = {
    # Make configuration.nix the source of truth for users.
    # When set to false, you will NOT be able to add users from the shell.
    mutableUsers = false;
    users = {
      beardedtek = {
        isNormalUser = true;
        description = "The Bearded Tek";
        createHome = true;
        home = "/home/beardedtek";
        group = "beardedtek";
        extraGroups = [
          "wheel"           # Enable sudo
          "docker"          # Enable docker
          "systemd-journal"
        ];
        hashedPassword = "$6$gUid22Le9ZVHH1qo$fzLvtkwTcPBDc7PuGN73eHGxCPRUW7Hvtnc/tQ2UYTWBdwBXPBz.9OtaI8mCtxnLGz0YPHjBR2neZI0PWsoSc/";
        openssh.authorizedKeys.keys = [
          (builtins.readFile ./sshkey_beardedtek)
        ];
        packages = with pkgs; [ ];
        uid = 1000;
      };
    };
    groups = {
      # Setup custom groups
      beardedtek = {
        name = "beardedtek";
        members = [ "beardedtek" ];
        gid = 1000;
      };
    };
  };
Allow Non-Free packages (Unfree as Nix calls it)
nixpkgs.config.allowUnfree = true;
Define packages to install
I decided on docker-compose, python311, plex, and cockpit
   environment.systemPackages = with pkgs; [
     nano # Why would I ever want vim to touch my system :)
     wget
     docker-compose
     nerdctl
     python311
     plex
     cockpit
   ];
Enable services on boot:
  virtualisation.docker.enable = true;
  services = {
    openssh.enable = true;
    plex.enable = true;
    cockpit.enable = true;
  };
Set Up Networking:
NOTE: Make sure to set your network interface if it doesn't match
You can find this out by issuing the command ip -a in a terminal
I disabled the firewall in this example since it is on my home network with no access from the outside world.
  networking = {
    interfaces.enp1s0.ipv4.addresses = [ {
      address = "192.168.2.15";
      prefixLength = 24;
    } ];
    defaultGateway = "192.168.2.1";
    nameservers = [
      "192.168.2.10"
      "192.168.2.145"
      "9.9.9.9"
      ];
    enableIPv6 = false;
    firewall = {
      enable = false;
    };
  };
Here's the whole thing together
{ config, pkgs, ... }:
{
  imports =
    [ # Include the results of the hardware scan.
      ./hardware-configuration.nix
    ];

  # Use the systemd-boot EFI boot loader.
  boot.loader.systemd-boot.enable = true;
  boot.loader.efi.canTouchEfiVariables = true;

  # Set your time zone.
  time.timeZone = "America/Anchorage";

  # User Setup

  users = {
    # Make configuration.nix the source of truth for users.
    # When set to false, you will NOT be able to add users from the shell.
    mutableUsers = false;
    users = {
      # Define each user here
      # Set user passwords by using the following command:
      #   export PW_USER=$(mkpasswd -m sha-512)
      # Set authorized ssh key using:
      #   export SSH_KEY_USER="your_ssh_key_here"
      beardedtek = {
        isNormalUser = true;
        description = "The Bearded Tek";
        createHome = true;
        home = "/home/beardedtek";
        group = "beardedtek";
        extraGroups = [
          "wheel"           # Enable sudo
          "docker"          # Enable docker
          "systemd-journal"
        ];
        hashedPassword = "$6$gUid22Le9ZVHH1qo$fzLvtkwTcPBDc7PuGN73eHGxCPRUW7Hvtnc/tQ2UYTWBdwBXPBz.9OtaI8mCtxnLGz0YPHjBR2neZI0PWsoSc/";
        openssh.authorizedKeys.keys = [
          (builtins.readFile ./sshkey_beardedtek)
        ];
        packages = with pkgs; [ ];
        uid = 1000;
      };
      root = {
        hashedPassword = "$6$gUid22Le9ZVHH1qo$fzLvtkwTcPBDc7PuGN73eHGxCPRUW7Hvtnc/tQ2UYTWBdwBXPBz.9OtaI8mCtxnLGz0YPHjBR2neZI0PWsoSc/";
      };
    };
    groups = {
      # Setup custom groups
      beardedtek = {
        name = "beardedtek";
        members = [ "beardedtek" ];
        gid = 1000;
      };
    };
  };

  # Allow non-free (Unfree) packages
  nixpkgs.config.allowUnfree = true;

  # List packages installed in system profile. To search, run:
  # $ nix search wget
   environment.systemPackages = with pkgs; [
     nano # Why would I ever want vim to touch my system :)
     wget
     docker-compose
     nerdctl
     python311
     plex
     cockpit
   ];

  # Enable docker
  virtualisation.docker.enable = true;

  # Enable Services
  services = {
    openssh.enable = true;
    plex.enable = true;
    cockpit.enable = true;
  };

  # Setup Networking
  networking = {
    interfaces.enp1s0.ipv4.addresses = [ {
      address = "192.168.2.15";
      prefixLength = 24;
    } ];
    defaultGateway = "192.168.2.1";
    nameservers = [
      "192.168.2.10"
      "192.168.2.145"
      "9.9.9.9"
      ];
    enableIPv6 = false;
    firewall = {
      enable = false;
    };
  };

  system.stateVersion = "23.05";

}
Now issue the command nixos-install and it will attempt to build.
If you come across errors, it will give you some basic information on where to look for your errors.
Please check back soon for more. I'll be adding to this mostly daily with what I've learned until I get my first system tuned exactly how I want it.